Why would you bother learning terraform?
Cloud computing nowadays is omnipresent. Why? Because a lot of programmer’s work can be outsourced (automated) using cloud, be done cheaper, and in a simpler way (more high-level).
So, why don’t all of the programmers immediately switch to the cloud? IMHO one of the problems lies in the fact that exploiting the potential of the cloud requires good understanding of DevOps concepts, like IaaC and tools that facilitate it. We’re also entering the realm of software (cloud) architecture, which is a little bit different to standard software development, like developing a REST API or ETL pipeline.
I want to learn cloud properly, because I believe in its potential. Unfortunetely most of the tutorials that I found on the internet are disappointingly shallow: they either present only the theoretical intuition on how specific services work or show how to set them up using AWS Management Console (or GCP Console), i.e. by clicking buttons in UI.
This is not how I would set up my services in the cloud. It does not live up to the quality that I am used to when I write code (TDD, CI/CD, reviews, version control, disaster recovery).
The tool that I came across that employs good quality code practises is terraform, which is (probably) the leader among IaaC solutions. It is simple enough, well documented, and broadly used, which brings a devoted community and quick responses to bugs and questions. There are also many decent tutorials available on youtube.
In this short article I present an example usage of terraform, where I set up an EC2 instance in a VPC.
Terraform primer
This is by no means an exhaustive description of how terraform works, but it should be informative enough to run all the code from this article on your own laptop.
Installation
Installation is straightforward. Just follow the steps described in terraform’s documentation.
Where you store the code
You store the code in <filename>.tf files in your project’s folder on your computer. The .tf files should definitely be added to the git repository of your project. You might name your first file main.tf.
What is the structure of the first .tf file
You begin your terraform file with a declaration of the cloud provider of your choice. For this tutorial we use AWS:
terraform {
  required_providers {
    aws = {
      source  = "hashicorp/aws"
      version = "5.47.0"
    }
  }
}
After that you might want to declare some global variables (global for this script, so terraform calls them “local”, ironically enough), which you will be able to use further in your resource declarations. In our case we use region and CIDR blocks.
locals {
  region            = "eu-central-1" # Frankfurt
  vpc_cidr_block    = "10.0.0.0/16"
  subnet_cidr_block = "10.0.0.0/24"
}
Finally we inform terraform where we store our AWS credentials.
provider "aws" {
  region                   = local.region
  shared_credentials_files = ["~/.aws/credentials"]
}
I recommend storing them in a ~/.aws/credentials file, which has the following structure:
[default]
aws_access_key_id = YouKeyID
aws_secret_access_key = YourSecretAccessKey
Downloading AWS plugin
When the main.tf file is ready, terraform is not yet aware that this is a terrafrom project and does not have AWS plugin installed. You do it with
terraform init
run from your project’s directory.
Adding resources
As you will see further in this tutorial, you add resources using “resource” keyword:
resource "<provider>_<resource_type> <name>" {
  <config options>
}
e.g.:
resource "aws_instance" "my-first-terraform-server" {
  ami           = "ami-026c3177c9bd54288"
  instance_type = "t2.micro"
  tags = {
    Name = "MyFirstUbuntuServer"
  }
}
Creating services
When your .tf file is ready, you applly your changes to the cloud with
terraform apply
command, but before you do that, you might want to preview the changes with
terraform plan
which prints differences between the current state of the cloud (which, by the way, is kept in terraform.tstate file). You may find it similar to git diff.
Declarative programming
You might have noticed that I often used the mord “declare” in this section. It is no concidence, since terraform uses declarative programming paradigm, which is short means that you define how the end result of the program should look like instead of describing how the program should achieve the result step by step.
Reverting changes
If you want to delete a service, simply remove its declaration from .tf file. terraform is declarative, so it produces the exact architecture declared in your .tf file, even if some services are destroyed.
There is even a more efficient way of destroying services:
terraform destroy
which stops and removes all the services declared in .tf file and no changes to the .tf file are necessary.
Architecture
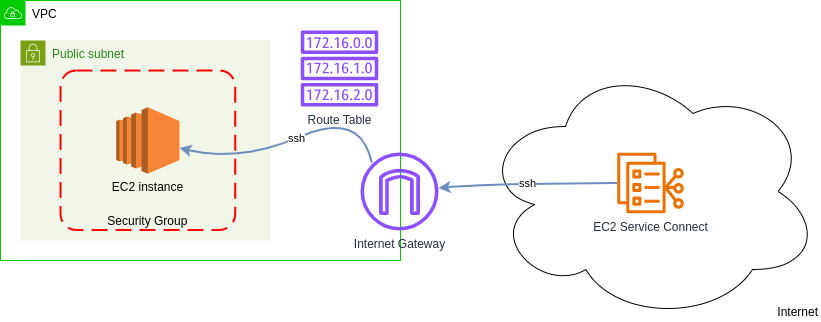
Components:
-
VPC - Virtual Private Cloud separates services from your project from other projects in your organization. AWS runs EC2 instances in VPCs, so we need to have one to run our EC2 instance.
-
Public Subnet - VPCs are defined per Region, while Subnets per Availability Zone. There are 2 types of Subnets: Public and Private. The only difference between them is that you can access Public Subnet from the interet. AWS runs EC2 instances in Subnets, so we need one.
-
Security Group - Provides firewall protection on the EC2 instance level. It allows only the traffic that we declare. In our case we only allow TCP requests on port 22, in other words, ssh connection.
-
EC2 instance - Virtual Machine provides by AWS.
-
Internet Gateway - Gateways connect networks, and this particular gateway connects our VPC to the internet.
-
EC2 Service Connect - simple AWS service which allows us to connect to EC2 instance from AWS Management Console. It is very convenient for debugging and testing.
Prerequsites, or what components you need to set up an EC2 instance
Most of youtube EC2 tutorials walk you through AWS Management Console, which provides some useful defaults, including a default VPC for your EC2 instance. In production setting you would probably rather avoid using this VPC, because:
-
One should not trust the defaults (what if they change the next time we set up our infrastructure? what if they actually do something that I didn’t predict?).
-
You use terraform when your project’s architecture is complicated and difficult to maintain with just AWS Management Console. If it is not, maybe you don’t even need terraform at all, just create your EC2 instance using Console. When you have a lot of services, it is much easier to group them and maintain accesses in separate VPCs.
-
It is quite easy to set up your own VPC once you learn how to do it. Learning might be difficult because the learning resources are scarce and obscure. In other words: why use the default one?
-
It is easier and cleaner to maintain firewalls when they are in a separate VPC. “Clean” as in “Clean Code”. It’s just better architecture.
(Surely you could modify the default VPC, but according to open-closed principle from SOLID, Software entities … should be open for extension, but closed for modification, so it might be a little bit more intuitive for other developers if you do not modify this object and create a new one instead).
So, we want to create a new VPC. Terraform makes it trivial (keep in mind that we have region defined in settings in some other place):
# "vpc" is a name of this object used internally by terraform. It does not
# appear anywhere in AWS
resource "aws_vpc" "vpc" {
  # CIDR consists of 4 octets separated by dots: 10, 0, 0, and 0. 16 after slash
  # means that the first 16 bits (10 and 0) are reserved as Network ID (nobody
  # inside of this network cannot modify them), but the remaining octets can be
  # assigned to hosts, e.g. 10.0.1.100/16
  cidr_block = "10.0.0.0/16"

  # tags are not mandatory, but the Name tag makes recognizing your
  # services/objects much easier in AWS Management Console
  tags = {
    Name = "VPC_EC2Setup"
  }
}
You might be wondering where this resource "aws_vpc" "vpc" {... syntax come from. You’ll find it in terraform’s excellent documentation. Whenever you add a new resource, I recommend consulting the documentation, at least to have a look at the examples section.
VPCs are defined per Region and they come with Subnets, which are defined per Availability Zone. Why would we need a Subnet? EC2 instance belongs to a particular subnet, so we don’t want to use a default one (actually if we use our own VPC, we would not be able to create an EC2 instance withoud creating any Subnet first).
# again, "subnet" is just a name used by terraform
resource "aws_subnet" "public_subnet" {
  # we want terraform to create both VPC and Subnet at the same time. But there
  # is a catch: a Subnet is configured *for a specific* VPC, so the VPC must
  # exist *first* and we need to provide its ID. How do we do that? We can refer
  # to the "vpc" object that we created previously by providing its resource
  # type (aws_vpc), then its name (vpc) and then the property name that we need
  vpc_id     = aws_vpc.vpc.id

  # 24 means that we use the first 3 octets as network id (our Subnet is a
  # network here), so they are not further configurable inside of this network.
  # We will be able to assing IPs like 10.0.1.0, 10.0.1.1, etc. to hosts inside
  # of this network
  cidr_block = "10.0.1.0/24"

  tags = {
    Name = "PublicSubnet_EC2Setup"
  }
}
But why is this Subnet named “Public”? Because we want to access it from outside of this VPC. We will be using a gateway for that, an Internet Gateway, to be more specific.
Subnets which are not accessible from the outside of the VPC are called “private” and they can be used for EC2 instances, to which the traffic is sent via a load balancer created in a public Subnet. You can read more about these differences in AWS documentation. Please keep in mind that the access from the internet to the Subnet is what makes it public, in other words it is its defining feature.
EC2 instance requires one more prerequisite: Security Group, which is a list of rules that allow or disallow inbound and outbound traffic. In AWS Security Groups are parts of VPC, but you can also access them from EC2 interface.
For now we only create the security group without providing any rules. We will get back to them when we discuss connecting our EC2 instance to the internet.
resource "aws_security_group" "security_group" {
  # here we also specify the name of the group, independently from Name tag
  name        = "SecurityGroup_EC2Setup"
  description = "Allow TLS inbound traffic"
  vpc_id      = aws_vpc.vpc.id

  tags = {
    Name = "SecurityGroup_EC2Setup"
  }
}
EC2 instance
Now we are ready to create our own EC2 instance, which is very simple with terraform:
resource "aws_instance" "ec2" {
  # you could use any other AMI, but this one is Free Tier eligle
  ami                         = "ami-026c3177c9bd54288"
  instance_type               = "t2.micro"
  subnet_id                   = aws_subnet.subnet.id
  vpc_security_group_ids      = [aws_security_group.security_group.id]
  associate_public_ip_address = true

  tags = {
    Name = "EC2_EC2Setup"
  }
}
We need public IP address so we knew where to send request to. I still don’t fully understand how this IP address corresponds to VPC’s address. Does AWS have another route table to figure out which instances belong to which VPCs?
Connecting to instance
If you look at the architecture diagram, you’ll see that there are 3 network components that are necessary for connection from the internet: Internet Gateway, Route Table, and EC2 Service Connect. We will use the last one for our convenience only, because in production setting you would use a Key Pair, which is an EC2 feature, or not provide ssh connection at all for security reasons.
Besides, current setting of our Security Group does not allow anyone in, so we will create an ingress rule for EC2 Service Connect.
Let’s begin with Internet Gateway:
resource "aws_internet_gateway" "internet_gateway" {
  vpc_id = aws_vpc.vpc.id

  tags = {
    Name = "InternetGateway_Ec2Setup"
  }
}
That was simple enough. Gateways allows traffic between networks, in our case between our VPC and the Internet. But how does a gateway know where it should route traffic? We specify route rules in Route Table:
resource "aws_route_table" "route_table" {
  vpc_id = aws_vpc.vpc.id

  route {
    # all trafic. security groups and NACLs are firewalls
    cidr_block = "0.0.0.0/0"
    gateway_id = aws_internet_gateway.internet_gateway.id
  }

  tags = {
    Name = "RouteTable_EC2Setup"
  }
}
Surely we could use the default one, but again, when you have multiple projects and, as a result, multiple VPCs in your company (which is the reason why you’d use terraform), you don’t want to use the defaults, because someone else can modify them.
Interestingly, you can have many Route Tables per VPC, because each Subnet might have different security requirements (e.g. a Private Subnet would not allow any traffic in. This serves kinda like a firewall, but firewalls are residing on a network connection, while we do not create any connection. Cable is not plugged in.) So, we need to associate the Route Table with our Subnet:
resource "aws_route_table_association" "route_table_association" {
  subnet_id      = aws_subnet.subnet.id
  route_table_id = aws_route_table.route_table.id
}
You might notice that we allow all traffic to the Internet Gateway, and that’s alright. Route Table is not firewall. For restricting specific IP addresses we use Security Groups (or NACLs, which we do not implement here. They’re firewalls on the subnet level).
Let’s add an ingress rule to allow access for EC2 Service Connect (we need to find its IP address first) to port 22 with TCP.
data "aws_ip_ranges" "region_ip_ranges" {
  regions  = [local.region]
  services = ["EC2_INSTANCE_CONNECT"]
}

resource "aws_vpc_security_group_ingress_rule" "vpc_seurity_group_ingress_rule" {
  security_group_id = aws_security_group.security_group.id
  # this is Frankfurt's IP, which allows EC2 Instance Connect to connect to this
  # instance
  cidr_ipv4         = data.aws_ip_ranges.region_ip_ranges.cidr_blocks[0]
  from_port         = 22
  ip_protocol       = "tcp"
  to_port           = 22

  tags = {
    Name = "AllowSSHIngress_EC2Setup"
  }
}
Where do we get this IP address from? terraform apart from resources can also retrieve data from cloud providers. In this case we can get IP ranges for specific regions.
Summary
Now that our main.tf file is ready:
main.tf
terraform {
  required_providers {
    aws = {
      source  = "hashicorp/aws"
      version = "5.47.0"
    }
  }
}

locals {
  region            = "eu-central-1"  # Frankfurt
  vpc_cidr_block    = "10.0.0.0/16"
  subnet_cidr_block = "10.0.0.0/24"
}

provider "aws" {
  region                   = local.region
  shared_credentials_files = ["~/.aws/credentials"]
}

data "aws_ip_ranges" "region_ip_ranges" {
  regions  = [local.region]
  services = ["EC2_INSTANCE_CONNECT"]
}

resource "aws_vpc" "vpc" {
  cidr_block = local.vpc_cidr_block

  tags = {
    Name = "VPC_EC2Setup"
  }
}

resource "aws_subnet" "subnet" {
  vpc_id     = aws_vpc.vpc.id
  cidr_block = local.subnet_cidr_block

  tags = {
    Name = "Subnet_EC2Setup"
  }
}

resource "aws_internet_gateway" "internet_gateway" {
  vpc_id = aws_vpc.vpc.id

  tags = {
    Name = "InternetGateway_Ec2Setup"
  }
}

resource "aws_route_table" "route_table" {
  vpc_id = aws_vpc.vpc.id

  route {
    # all trafic. Security Groups and NACLs are firewalls
    cidr_block = "0.0.0.0/0"
    gateway_id = aws_internet_gateway.internet_gateway.id
  }

  tags = {
    Name = "RouteTable_EC2Setup"
  }
}

resource "aws_route_table_association" "route_table_association" {
  subnet_id      = aws_subnet.subnet.id
  route_table_id = aws_route_table.route_table.id
}

resource "aws_security_group" "security_group" {
  name        = "SecurityGroup_EC2Setup"
  description = "Allow TLS inbound traffic and all outbound traffic"
  vpc_id      = aws_vpc.vpc.id

  tags = {
    Name = "SecurityGroup_EC2Setup"
  }
}

resource "aws_vpc_security_group_ingress_rule" "vpc_seurity_group_ingress_rule" {
  security_group_id = aws_security_group.security_group.id
  # this is Frankfurt's IP, which allows EC2 Instance Connect to connect to this
  # instance
  cidr_ipv4         = data.aws_ip_ranges.region_ip_ranges.cidr_blocks[0]
  from_port         = 22
  ip_protocol       = "tcp"
  to_port           = 22

  tags = {
    Name = "AllowSSHIngress_EC2Setup"
  }
}

resource "aws_instance" "ec2" {
  ami                         = "ami-026c3177c9bd54288"
  instance_type               = "t2.micro"
  subnet_id                   = aws_subnet.subnet.id
  vpc_security_group_ids      = [aws_security_group.security_group.id]
  associate_public_ip_address = true

  tags = {
    Name = "EC2_EC2Setup"
  }
}
we can set up our infrastructure in AWS using terraform apply.
To see if everything works, go to AWS Management Console -> EC2 -> Instances ->
And now you can destroy everything with terraform destroy.
Resources
Figuring out all of the above was quite difficult. These are the resources that I found helpful:
-
A really nice terraform tutorial for absolute beginners - this is where I would start your journey.
-
Excellent practical tutorial on VPC, which walks you through step-by-step on how to set up EC2 on AWS with all the network components.
-
Excellent theoretical tutorial on VPC, but you probably need only first 20-30 minutes for this project. This will give you very good theoretical background on how networking in AWS works plus some general information about networking, like what CIDR is.
-
None of the tutorials that I enlisted above gave me a satisfactory explanation of how Routing Table works, so I read one chapter from Networking All-in-One For Dummies by Doug Lowe: Book 2 (Understanding Network Protocols), Chapter 4 (Routing).