1. Can you tell the difference between these two cars?
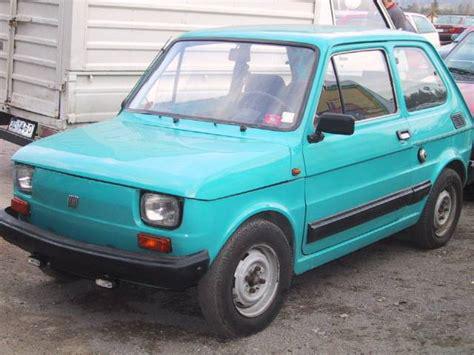
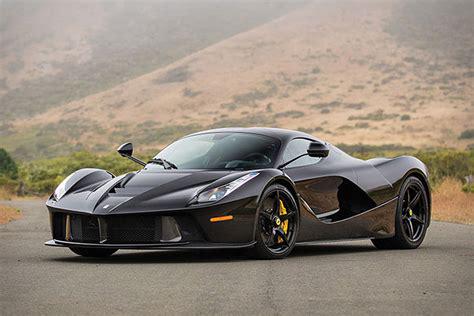
Me neither, but let’s see if a convolutional neural network can.
2. What am I doing?
I am practicing my CNN skills on a subject that is particularly close to my heart: a legendary vehicle Fiat 126p in which I was travelling around Poland with my family in the 1990s. To me this was the best car in the world and it left many cars behind in various categories, mainly styling and… well, styling.
My goal is to learn a neural network to tell if a picture presents a Fiat 126 or La Ferrari (should one say “a” La Ferrari?). Sounds super easy for a human, but let’s see whether an artificial neural networks can compete with real, human neural networks in this task.
3. Data
Data for this task are obviously images, which can be downloaded from e.g. Google Images or Bing. This time I’ve used bing for it’s relatively simple API and a chance to try Azure out, as you need to be a registered user there to use the API. Here comes the code for downloading images of Fiats and Ferraris:
import requests
import os
from pathlib import Path
from PIL import Image
from io import BytesIO

from dotenv import load_dotenv  # I love this package

load_dotenv()


SEARCH_URL = "https://api.bing.microsoft.com/v7.0/images/search"
HEADERS = {"Ocp-Apim-Subscription-Key": os.environ["AZURE_SUBSCRIPTION_KEY"]}


def image_to_hex(image):
    """ converts image to hex for unique file name """
    # https://stackoverflow.com/a/49692185
    img = image.resize((10, 10), Image.ANTIALIAS)
    img = img.convert("L")
    pixel_data = list(img.getdata())
    avg_pixel = sum(pixel_data) / len(pixel_data)
    bits = "".join(["1" if (px >= avg_pixel) else "0" for px in pixel_data])
    hex_representation = str(hex(int(bits, 2)))[2:][::-1].upper()  # for deduplication
    return hex_representation


def download_images(cars, colors):
    # https://docs.microsoft.com/en-us/azure/cognitive-services/bing-image-search/quickstarts/python
    data_path = Path("data")
    data_path.mkdir(exist_ok=True)
    images_urls = dict()
    for car in cars:
        images_urls[car] = []
        car_path = data_path / car.replace(" ", "-")
        car_path.mkdir(exist_ok=True)
        for color in colors:
            params = {"q": f"{car} {color}", "count": 100}
            response = requests.get(SEARCH_URL, headers=HEADERS, params=params)
            response.raise_for_status()
            search_results = response.json()
            thumbnail_urls = [
                img["thumbnailUrl"] for img in search_results["value"]
            ]
            for url in thumbnail_urls:
                image_data = requests.get(url)
                image_data.raise_for_status()
                image = Image.open(BytesIO(image_data.content))
                image_hex = image_to_hex(image)
                file_name = car_path / f"{color}_{image_hex}.jpg"
                image.save(file_name)


if __name__ == "__main__":
    cars = ["fiat 126", "la ferrari"]
    colors = ["blue", "yellow", "red", "green", "white", "black"]
    download_images(cars, colors)
After a few trials I realized I needed to balance the dataset by providing another layer: color. Ferraris are not always red after all. Another issue was that API happened to respond with duplicates, which I had to deduplicate for training. In general I prefer to have the dataset clean and ready for training as soon as possible, so I have done this in this step: I used hex hashes, which can be deduplicated much easier than the whole images. Phashes are also a common solution to this problem.
Having downloaded the data, I moved on to training.
4. Let’s learn something
Libraries first
import torch
import torch.nn as nn
from torch.utils.data import DataLoader
from torchvision import models
from torchvision.datasets import ImageFolder
from torchvision.transforms import (Compose, RandomHorizontalFlip,
                                    RandomResizedCrop, Resize, ToTensor)
from tqdm import tqdm  # progress bar useful during training
I’ve used pytorch for its popularity and simplicity.
Data - second
# minimal augmentation
augmentation = Compose(
    [
        RandomResizedCrop((256, 256), scale=(0.8, 1.0), ratio=(1.0, 1.0)),
        RandomHorizontalFlip(),
        ToTensor(),
    ]
)
transformers = Compose([Resize((256, 256)), ToTensor()])

train_dataset = ImageFolder("data/train", transform=augmentation)
train_loader = DataLoader(train_dataset, batch_size=10, shuffle=True)

val_dataset = ImageFolder("data/validation", transform=transformers)
val_loader = DataLoader(val_dataset, batch_size=10, shuffle=True)
When I was downloading data with bing, I already saved them in proper localizations:
.
├── train
│   ├── fiat-126
│   └── la-ferrari
└── validation
    ├── fiat-126
    └── la-ferrari
so I can easily use torchvisions’ ImageFolder now. I’ve used basic augmentation to see if it the learning still works well. There’s no need to optimize pre-maturely ;)
Here comes the net
class Net(nn.Module):
    def __init__(self):
        super().__init__()
        self.model = models.mobilenet_v2(pretrained=True)

        # freeze all the layers except the last two
        for param in self.model.features[:-2].parameters():
            param.requires_grad = False

        self.model.classifier = nn.Sequential(
            # self.model. ... - classifier layer's name depends on the model
            nn.Linear(self.model.classifier[1].in_features, 500),
            nn.ReLU(),
            nn.Dropout(),
            nn.Linear(500, 2),
        )

    def forward(self, x):
        return self.model(x)
I’ve used mobilenet_v2 for no particular reason: this is such a simple task that probably any network would work just fine. Of course as long as we talk about transfer learning: I downloaded only about 500 images and trained the net on them.
And training
device = "cuda"
net = Net()
net.to(device)
optimizer = torch.optim.Adam(net.parameters(), lr=0.0001)
criterion = nn.CrossEntropyLoss()

for i in tqdm(range(3), desc="epoch", position=1):
    for inputs, labels in tqdm(train_loader, desc="training", position=0):
        outputs = net(inputs.to(device))
        loss = criterion(outputs, labels.to(device))
        optimizer.zero_grad()  # zero the previous gradients
        loss.backward()  # calculates the gradient on weights
        optimizer.step()  # goes down the gradient
Nothing fancy, just standard pytorch. The only thing worth mentioning is tqdm which I’ve discovered recently when deep diving into fastai. It makes progress bars way more readible.
One more thing: 3 epochs is more than enough, but as long as I use CUDA and the dataset has only 500 images, it doesn’t make much difference after all. Maybe even freezing the last two CNN layers of the network (which I unfroze so they could fine-tune to Fiat and Ferrari) wouldn’t change much.
5. What did you learn then?
Let’s see how our neural network does on validation dataset:
os = []
ls = []
for inputs, labels in tqdm(val_loader):
    outputs = net(inputs.to(device))
    os.append(outputs.argmax(dim=1).to("cpu"))
    ls.append(labels.to("cpu"))

os = torch.cat(os)
ls = torch.cat(ls)
print("\nvalidation set accuracy:", (os == ls).sum() / len(os))
The accuracy is, quite shockingly, 100%. I don’t think I will ever learn a better model. I am quite sure, actually. 100% sure.
6. But.. does it really work?
There are several ways to find out. One of them is Grad-CAM implemented e.g. here - pytorch-grad-cam which I’ve described shortly here.
import numpy as np
import PIL.Image
from pytorch_grad_cam import GradCAM
from pytorch_grad_cam.utils.image import show_cam_on_image
from torchvision import transforms

# the last convolutional layer
# in your case it may be different, depends on the model/net
target_layer = net.model.features[-1]

im, label = val_dataset[0]  # a random image from validation set
input_tensor = im.unsqueeze(dim=0)
im_rgb = np.array(transforms.ToPILImage()(input_tensor[0]).convert("RGB")) / 255
cam = GradCAM(model=net, target_layer=target_layer, use_cuda=True)

grayscale_cam = cam(input_tensor=input_tensor, target_category=label)
grayscale_cam = grayscale_cam[0, :]
visualization = show_cam_on_image(im_rgb, grayscale_cam)

PIL.Image.fromarray(visualization)  # displays the image
Let’s take a look at some of the images interpreted by Grad-CAM:
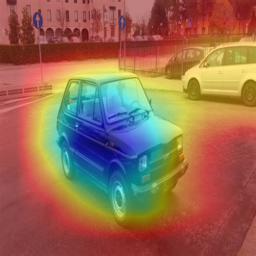

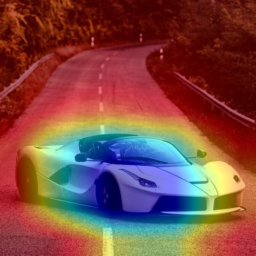
It can be clearly seen that the neural network actually looks at the cars, which is very important. I learned a shallow neural network on this very same dataset once, it’s accuracy was incomparably lower (75%) and it turned out that its predictions were based on the trees behind the cars (or rather: big green areas), as Fiats are much more often photographed in nature. That network clearly could not scale well.
Anyways, Grad-CAM seems to be detecting where a car is in the picture… How about playing with object detection for a while?
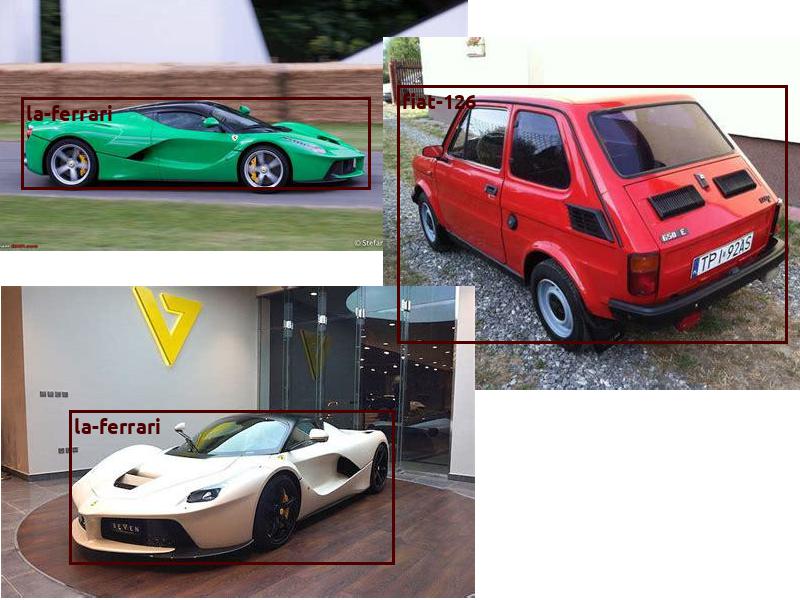
7. But which one exactly is ferrari?
Imagine there are two cars in the picture: a Fiat 126 and a La Ferrari (I could not find any single photo of two of these cars next to each other). What would the neural network say? I might be slightly confused. To relieve its confusion we may use object detection, which first detects where are cars in the picture and then makes a separate prediction for each of them.
Let’s initiate such a network:
from PIL import Image, ImageDraw, ImageFont

device = "cuda"
model = models.detection.fasterrcnn_resnet50_fpn(pretrained=True, min_size=500)
model.eval().to(device)
It is a rather old-style type of object detection network, RCNN. There are many newer approaches, but this one will work just fine and is already implemented in torchvision.models, so its setup takes just one line of code! Quite convenient.
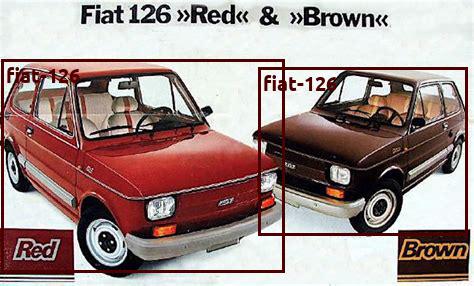
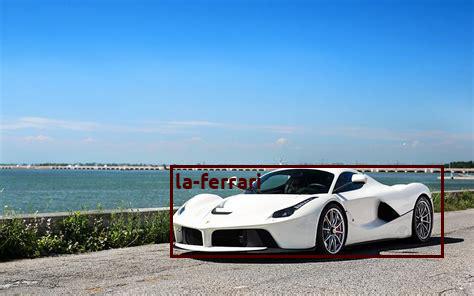
Having the network up and ready we follow these steps:
- detect the cars in the picture. RCNN will give us coordinates of all the objects it found in the picture with their confidence (how sure the network is that it actually is this object)
- for each “box”, which is a rectangle around a car, we predict whether it’s a Fiat 126 of La Ferrari
- and draw both the rectangles and the prediction in the picture.
The function below conveniently runs the procedure described above:
def detect_on_image(image):
    im = transforms.ToTensor()(image).to(device)
    im = im.unsqueeze(0)
    outputs = model(im)
    outs = outputs[0]

    # I like this "condition" way of coding - I find it very simple and intuitive
    car_cond = outs['labels'] == 3  # "3" - label for cars in coco dataset
    confidence_cond = outs['scores'] >= 0.8  # prediction confidence over 80%
    # predictions, which are cars and are confident
    car_conf_boxes = outs['boxes'][car_cond & confidence_cond].detach().cpu()

    draw = ImageDraw.Draw(image)
    color = "#4d0000"
    # you can download this font from here https://fonts.google.com/specimen/Ubuntu
    font = ImageFont.truetype("./Ubuntu-Bold.ttf", size=20)
    for box in car_conf_boxes:
        sub_image = image.crop(box.numpy())
        outputs = net(transformers(sub_image).unsqueeze(0).to(device))
        output = outputs[0]
        pred_index = int(torch.argmax(output).detach().cpu())
        class_name = train_dataset.classes[pred_index]
        coords = (tuple(box[:2]), tuple(box[2:]))
        draw.rectangle(coords, outline=color, width=3)
        draw.text([c + 5 for c in coords[0]], class_name, fill=color, font=font)
    return image
And here are some examples (random images from validation dataset and one, which I prepared specifically for this task in gimp):
detect_on_image(Image.open("data/validation/fiat-126/black_C7070B0608000C097CFDFFFFF.jpg")).save("fiat_detected.jpg")
detect_on_image(Image.open("data/validation/la-ferrari/white_FF300838D06EFFFFFBFF0E3.jpg")).save("ferrari_detected.jpg")
detect_on_image(Image.open("test.png")).save("fiat_ferrari_detected.jpg")
This works quite well, actually. I’ve come up with some random ideas of how it could be used. I’m not sure whether they make sense or not:
-
for marketing: car dealers would drive around the biggest cities (or use Google Maps or city surveillance) to check which cars are the most popular in this particular region. This might be helpful to choose the optimal targets for marketing, e.g. we can see that in Warsaw people usually drive expensive, new BMWs, so an Audi dealer could build a new Audi agency in Warsaw instead of any other place. This is an extremely simplified version of this idea, there are many more factors to take into consideration.
-
for economic policy, to find out which regions are richer than the others, based on prices of the cars. Or which cultures promote showing off.
We would have to expand the dataset for more car brands, but the data is easily available on the internet.